Camber MCP
Camber MCP is how you connect Camber to the AI apps you already use, like Claude, Cursor, Antigravity IDE, and ChatGPT. Once connected, an app can reach your Camber account directly: it can talk to your Camber agents, create new ones, and work with your files, all from inside your normal chat. You address agents with the same @mention tags you use in Nova. It is built on the open Model Context Protocol (MCP) standard, and you connect by signing in with your Camber account, so there is no API key to manage.
This page covers setup, connecting Claude, Cursor, Antigravity IDE, or ChatGPT, moving local work into Camber with Context Mirror, and reference for the tools and skills Camber MCP provides.
Set up Camber MCP
Camber MCP server endpoint
Every client uses this HTTP MCP endpoint:
https://camber-mcp.cambercloud.com/mcp
Claude
Claude comes in three forms: the Claude Code command-line tool, the Claude Desktop app, and Claude.ai in your browser. Pick the one you use below. All three use the same Client ID:
| App | OAuth Client ID |
|---|---|
| Claude | IPUNLiAS5zj2ZS8B |
Claude Code
Claude Code is Anthropic’s command-line assistant. Install it and sign in following Anthropic’s guide, then add Camber with one command.
To make Camber available in every project on your computer, run:
claude mcp add --transport http --scope user \
  --client-id IPUNLiAS5zj2ZS8B \
  --callback-port 17653 \
  camber-mcp https://camber-mcp.cambercloud.com/mcp
To share the Camber MCP configuration with everyone working in the current project, use project scope:
claude mcp add --transport http --scope project \
  --client-id IPUNLiAS5zj2ZS8B \
  --callback-port 17653 \
camber-mcp https://camber-mcp.cambercloud.com/mcp17654 and 17655.
Run claude mcp remove camber-mcp, then repeat the setup command above with
--callback-port 17654 or --callback-port 17655. You only need one available callback port.No additional MCP helper is required. Authenticate from your terminal:
claude mcp login camber-mcpYou can also type /mcp in Claude Code, pick camber-mcp, and finish the login in the browser window that opens.
Use agents in Claude Code
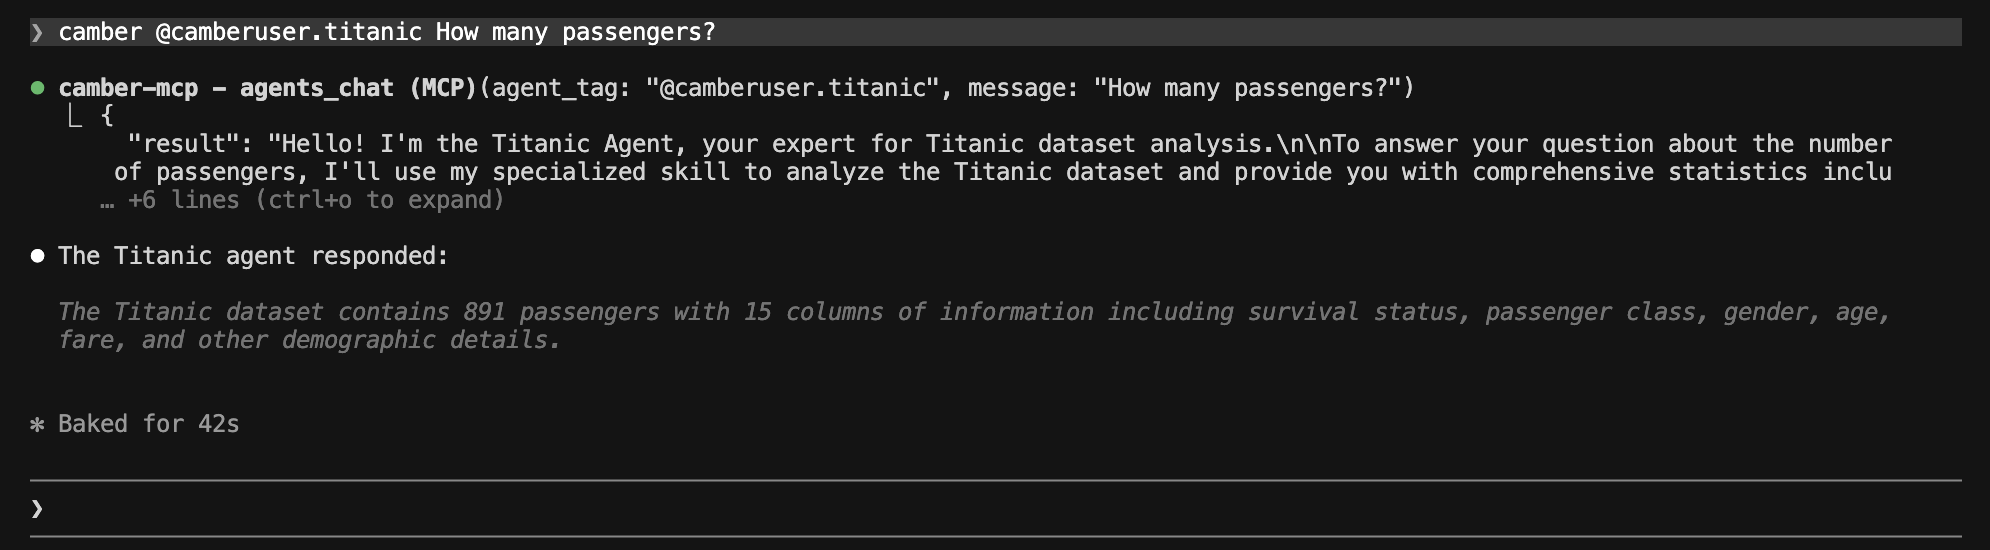
In the Claude Code terminal, talk to a Camber agent by starting your message with camber and the agent’s tag:
camber @username.agent_alias Your question hereFor example: camber @camberuser.titanic How many passengers?
Claude Desktop and Claude.ai
Both the Claude Desktop app and Claude.ai in your browser connect to Camber the same way, by adding it as a connector.
- Open Settings, then Connectors.
- Select Add custom connector.
- For the URL, paste
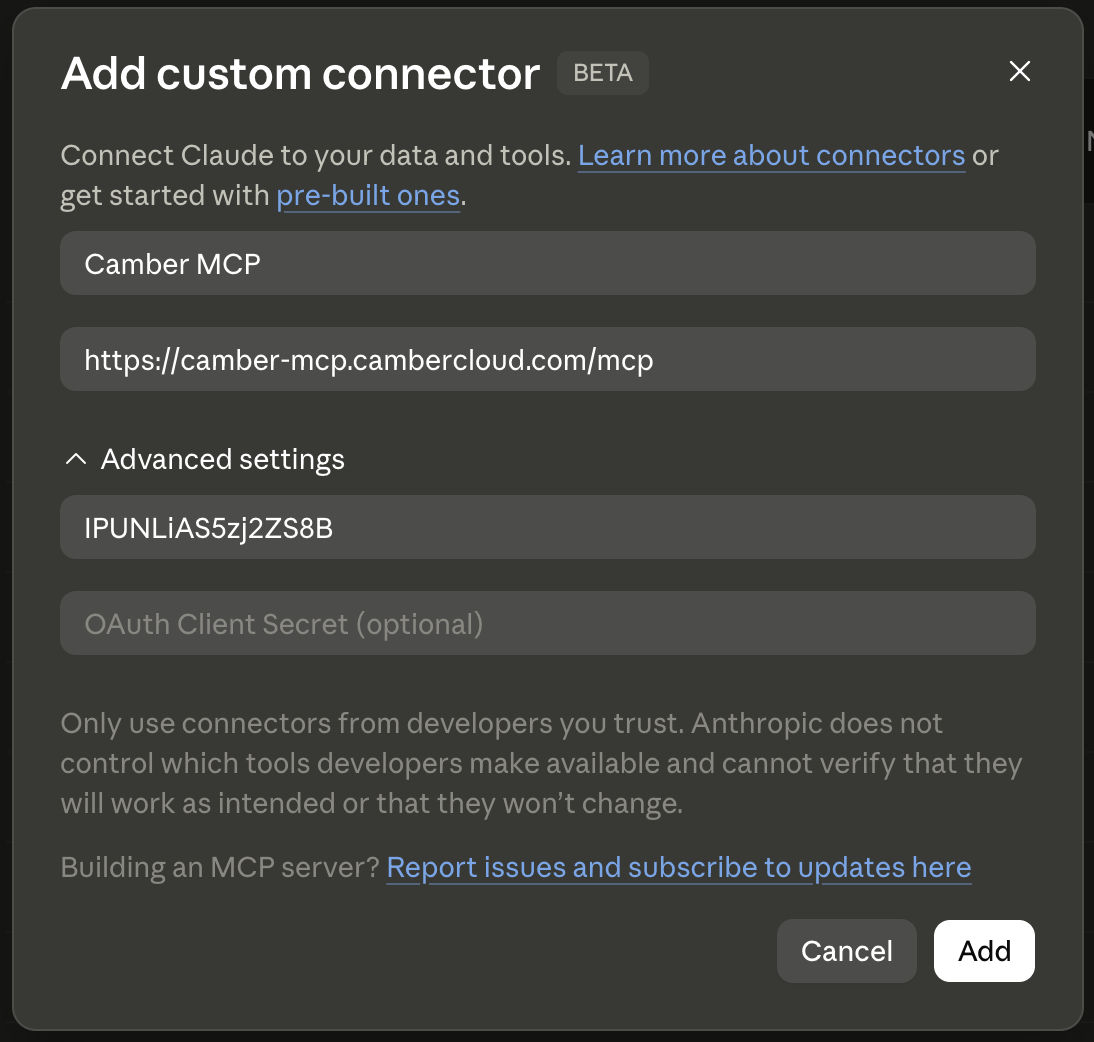
https://camber-mcp.cambercloud.com/mcp. - If it asks for OAuth details, paste the Claude Client ID from the table above and leave the Client Secret box empty.
- Select Connect, sign in with your Camber account, and approve access.
Your Add custom connector window should look like this. If you don’t see the Client ID box, open Advanced settings first.
Once it says connected, talk to your agents right in the chat box, using the same tags as in Nova: @<username>.<agent_alias> for a personal agent, or @<teamname>.<agent_alias> for a team agent.
Cursor
Cursor can connect directly to Camber’s remote HTTP MCP server. It uses OAuth with PKCE, so you only need the public Client ID below. Do not add a Client Secret.
| App | OAuth Client ID |
|---|---|
| Cursor | F5jr4lJdWRpXrK3Z |
To make Camber available in every project, add the following entry to ~/.cursor/mcp.json:
{
  "mcpServers": {
    "camber-mcp": {
      "url": "https://camber-mcp.cambercloud.com/mcp",
      "auth": {
        "CLIENT_ID": "F5jr4lJdWRpXrK3Z",
        "scopes": [
          "openid",
          "profile",
          "email"
        ]
      }
    }
  }
}
If ~/.cursor/mcp.json already contains other MCP servers, add only the camber-mcp entry inside the existing mcpServers object.
After saving the file:
- Open Cursor Settings, then Tools & MCP.
- Find camber-mcp and select Connect.
- Sign in with your Camber account in the browser window that opens and approve access.
Once Cursor shows Camber as connected, ask Cursor’s Agent to use Camber MCP and address agents with the same tags as in Nova: @<username>.<agent_alias> for a personal agent, or @<teamname>.<agent_alias> for a team agent.
Antigravity IDE
Google Antigravity IDE connects to Camber through a custom remote MCP server. It uses OAuth with a public Client ID, so do not add a Client Secret.
| App | OAuth Client ID |
|---|---|
| Antigravity IDE | EG70TqeICYsrofgQ |
- At the top center of Antigravity IDE, open the
···menu and select MCP Servers. - Select Manage MCP Servers, then View raw config.
- Add the following entry to
~/.gemini/config/mcp_config.json:
{
  "mcpServers": {
    "camber-mcp": {
      "serverUrl": "https://camber-mcp.cambercloud.com/mcp",
      "oauth": {
        "clientId": "EG70TqeICYsrofgQ"
      }
    }
  }
}
If the file already contains other MCP servers, add only the camber-mcp entry inside the existing mcpServers object.
After saving the file:
- Open Agent Settings with Cmd+, on macOS or Ctrl+, on Windows and Linux.
- Go to Customizations. If camber-mcp is not listed, select Refresh.
- Select Authenticate next to camber-mcp, sign in with your Camber account, and approve access.
- Copy the authorization code from the browser, paste it into Antigravity IDE, and select Submit.
Once Antigravity IDE shows Camber as connected, ask its agent to use Camber MCP and address agents with the same tags as in Nova: @<username>.<agent_alias> for a personal agent, or @<teamname>.<agent_alias> for a team agent.
ChatGPT
Connect ChatGPT to Camber as an MCP plugin using OAuth:
| App | OAuth Client ID |
|---|---|
| ChatGPT | Nxc59XcXdNQUiI9V |
- Open Settings, then Security and login, and turn on Developer mode.
- Open ChatGPT Plugins and select the plus button.
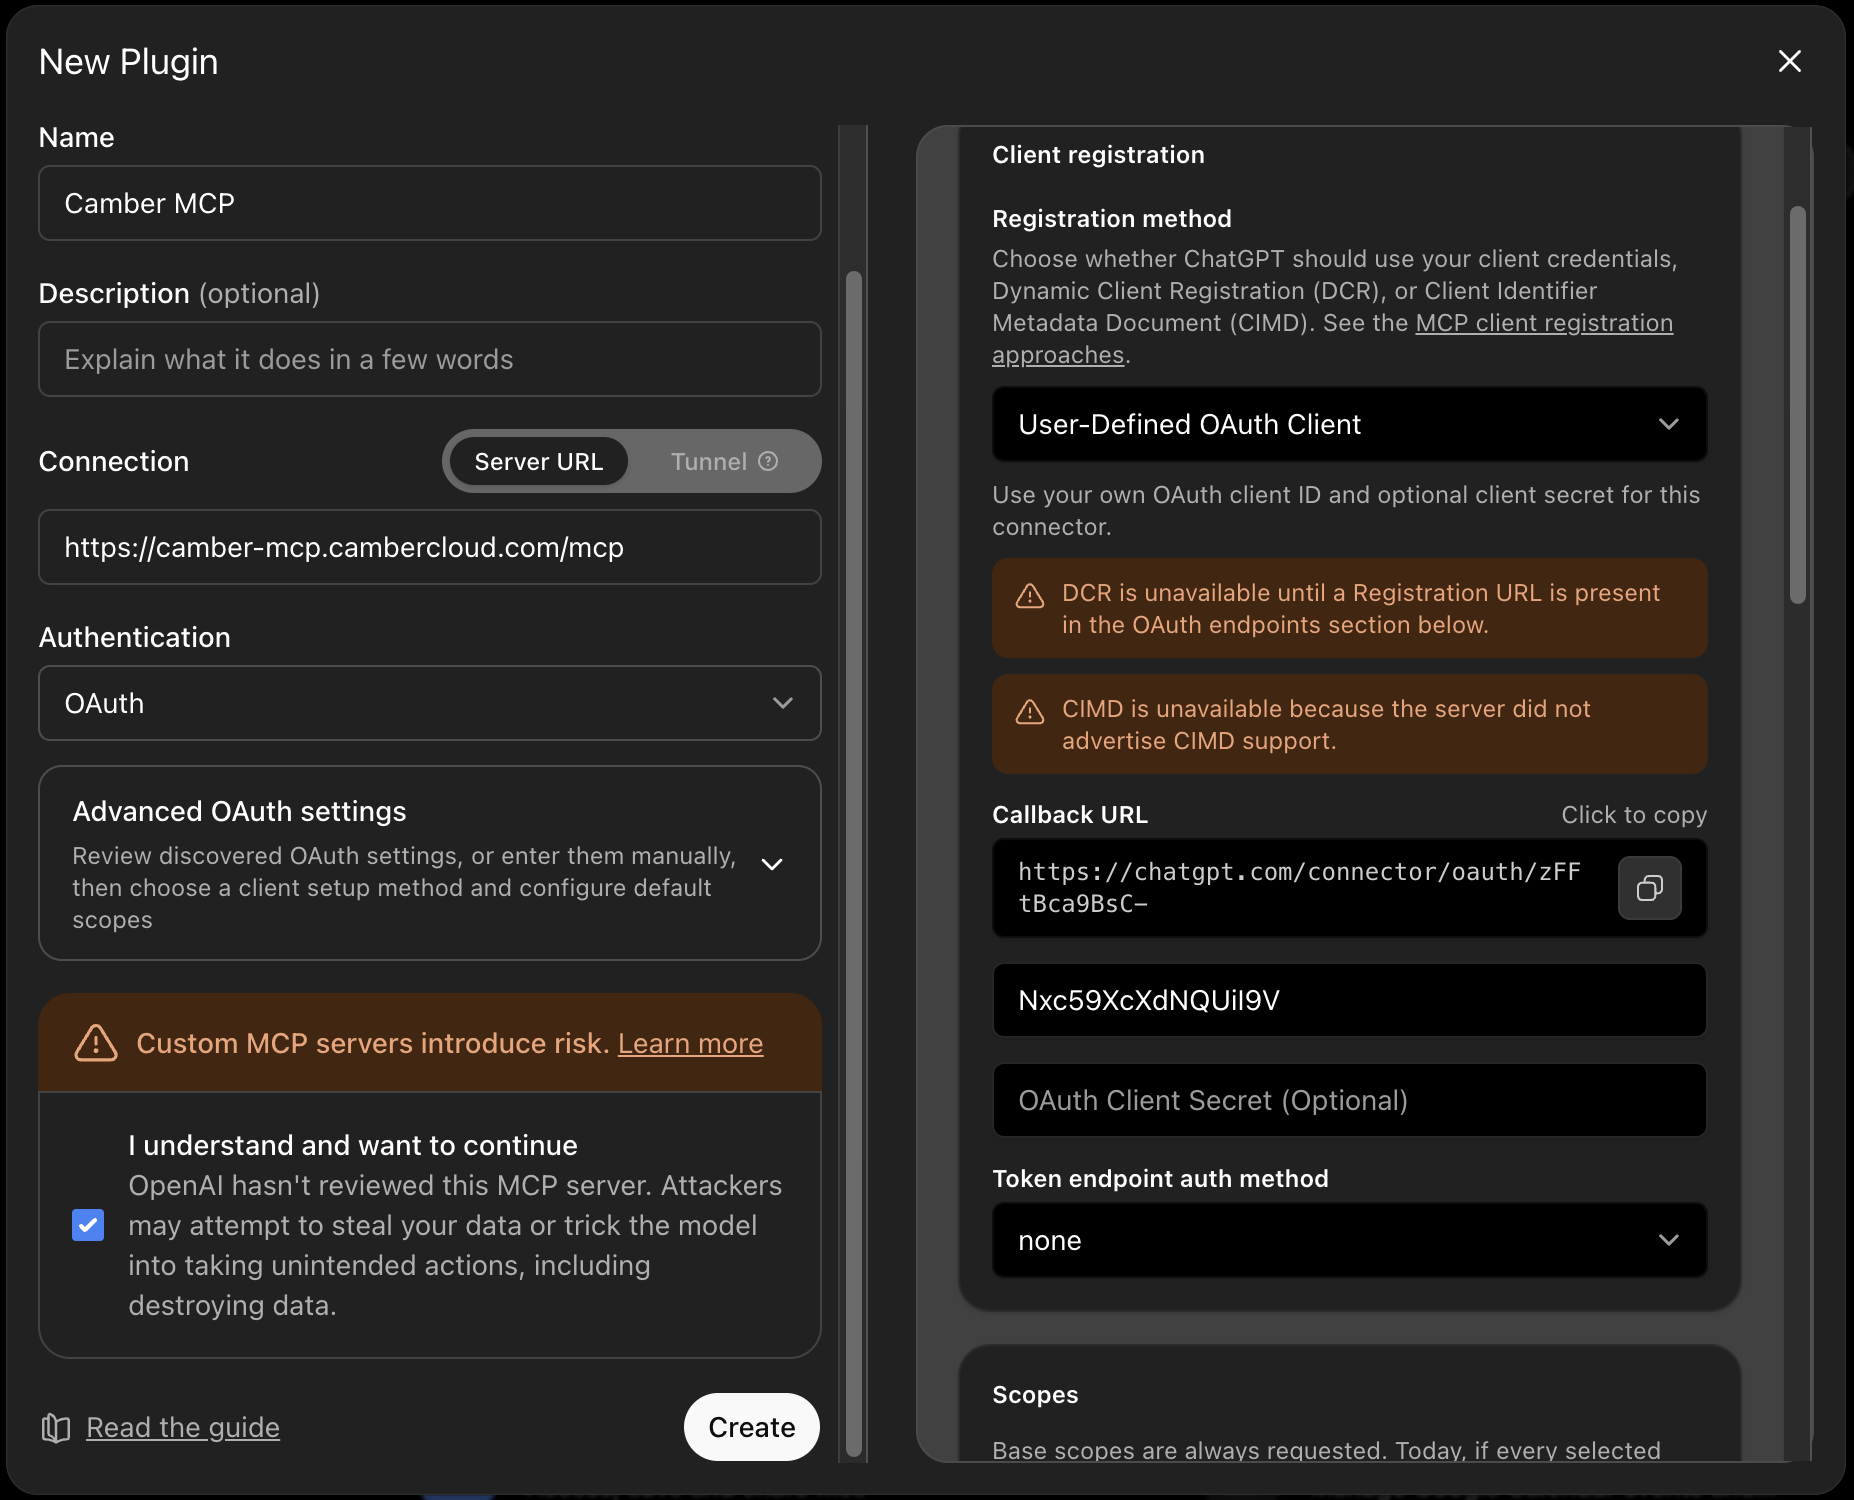
- Enter a name and description for Camber. Under Connection, enter
https://camber-mcp.cambercloud.com/mcpas the public MCP server URL. - Select OAuth.
- Open Advanced OAuth settings. Set the registration method to User-Defined OAuth Client, paste the ChatGPT Client ID above, leave the Client Secret empty, and set the token endpoint auth method to none.
- Confirm that you understand the custom MCP server warning, select Create, then sign in with your Camber account and approve access.
Your New Plugin window should look like this, with the Camber URL, OAuth selected, and the ChatGPT Client ID filled in:
After creating the plugin, start a new conversation and add Camber from the tools menu. Talk to your agents using the same tags as in Nova: @<username>.<agent_alias> for a personal agent, or @<teamname>.<agent_alias> for a team agent.
Camber MCP tools
The camber-mcp server currently exposes these tools:
| Tool | Purpose |
|---|---|
usage_guide | Returns onboarding instructions for this session: tools, CLI prerequisites, and how to find skills and resources. |
user_info | Shows the authenticated Camber user and available teams. |
teams_list | Lists the team and personal workspaces you can select. |
teams_select | Selects the active team or personal workspace. |
agents_create | Creates a personal or team Camber agent. |
agents_chat | Chats with a Camber agent by @owner.alias tag. |
agents_list | Lists available Camber agents by scope. |
Your MCP client also shows the live parameter schema for each tool.
usage_guide
Returns onboarding instructions for the current session: how to verify the Camber CLI and login (camber me), how the agent chat submit-and-check flow works, and when to use the Context Mirror skill. Takes no parameters. Your assistant calls this on its own at the start of a session, so you don’t need to.
user_info
Shows the Camber account connected to MCP, including your username, email, and teams. This is useful when you want to confirm which personal or team workspace your agents belong to.
Example response:
{
  "email": "user@example.com",
  "username": "camberuser",
  "teams": [
    {
      "display_name": "Research Team",
      "team_name": "research-team"
    }
  ]
}
teams_list
Lists your team and personal workspaces. Each result includes the display name, unique team name, workspace type, and whether it is currently selected. This tool takes no parameters.
Example response:
[
  {
    "display_name": "Research Team",
    "team_name": "research-team",
    "is_personal": false,
    "is_selected": true
  }
]
Use team_name from this response when calling teams_select.
teams_select
Selects the active team or personal workspace.
| Parameter | Description |
|---|---|
team_name | Unique team name returned by teams_list. Use this to select a team. |
personal | Set to true to select your personal workspace. Default is false. |
Provide exactly one target: either team_name or personal=true. You can select only an active team that you belong to.
The response confirms the selected workspace and returns the same fields as teams_list.
You can perform the same workflow from a terminal with camber team list and camber team select.
agents_create
Create a Camber agent. Creates a personal agent by default, pass team_name to create the agent for a team you belong to.
| Parameter | Description |
|---|---|
name | Display name for the agent. |
alias | Alias used in the agent tag, for example my-agent in @owner.my-agent. |
description | Optional short description of the agent. |
instructions | Optional instructions that define the agent behavior. For Context Mirror agents, this should include the synthesized workspace understanding. |
team_name | Optional team unique name. Omit for a personal agent. |
structured_output | Whether the agent should return structured output. Default is false. |
agents_chat
Chat with a Camber agent by tag and message. Returns the agent’s reply as text.
| Parameter | Description |
|---|---|
agent_tag | Tag of the agent to use. Include the leading @, format is @<owner_name>.<agent_alias> (for example, @camber_user.ai-agent-1). |
message | The message to send to the agent. |
model_id | Model name for the agent run (for example, Haiku, Sonnet). Default is claude-sonnet-4-6. |
conversation_id | Optional existing conversation ID to continue a multi-turn thread. |
Use agents_chat from Claude Code (for example via the camber CLI pattern shown above) or any other connected MCP client.
agents_list
List Camber agents you can use, with optional scope and pagination. Returns agent metadata and page info (for example total count and page size).
| Parameter | Description |
|---|---|
scope | Which agents to include: community (community agents), system (system agents), or team (agents for a specific team). Omit or leave unset to list your personal agents. |
team_name | When scope is team, the team’s unique name. Ignored for other scopes. |
page | Page number to fetch (default: 1). |
size | Agents per page (default: 20). |
Camber MCP skills and resources
On top of the tools above, Camber MCP ships skills: ready-made instructions your assistant loads only when it needs them. You don’t call a skill or read anything yourself. When you ask for something a skill covers, your MCP client picks it up automatically and follows it. Skills are why the assistant already knows the correct Camber steps without you spelling them out.
Camber MCP currently provides these skills:
Context Mirror
Lets your assistant move your local project into Camber, and back, the right way. Ask it to “mirror this project into Camber,” and it knows how to:
- create (or update) the matching Camber agent,
- upload your project files, chat history, and skills,
- pull an existing mirrored agent back to your machine,
- and push local changes back up to Camber.
See Context Mirror for the full walkthrough.